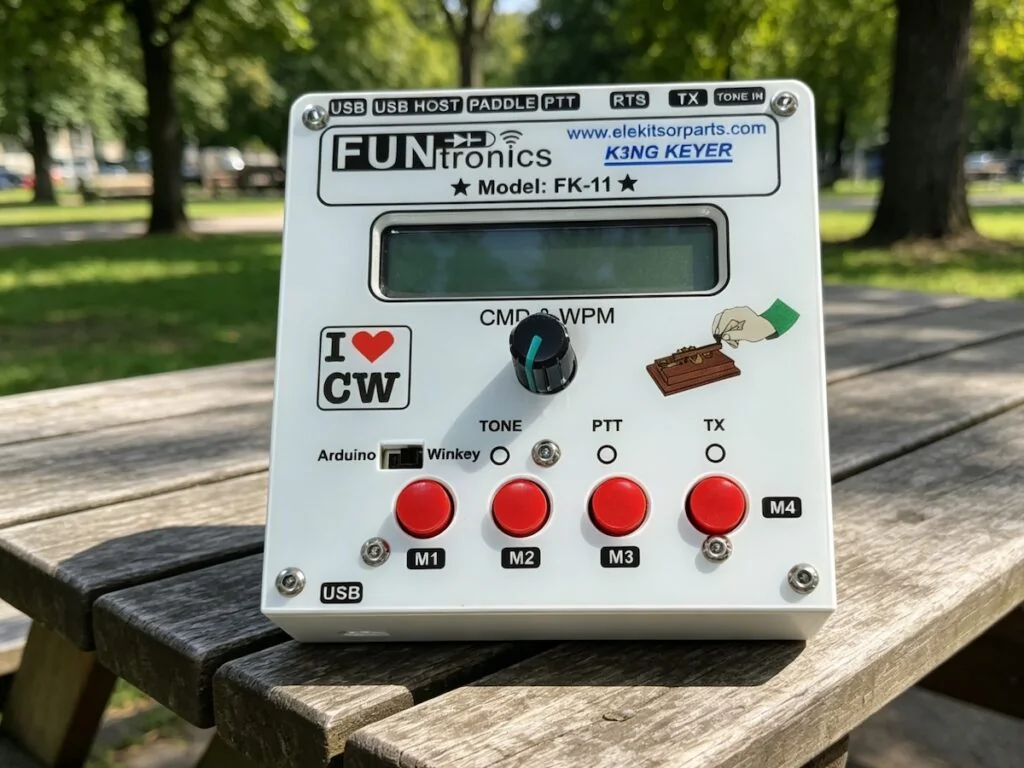
The Funtronics K3NG Keyer is an Arduino-based CW keyer with Winkey emulation, USB keyboard support, paddle input, memories, rotary speed control, and command-line configuration. This guide turns the original PDF manual into a searchable web reference for setup and daily operation.
Related product: Funtronics K3NG Keyer with 99% Winkey emulation.
Download the original Funtronics K3NG Keyer PDF manual.
What This Keyer Does
The keyer is based on the open-source K3NG Arduino CW keyer project. It is designed for compact desktop use and supports a wide range of CW operating styles, including paddle operation, Winkey-compatible contest logging, USB keyboard sending, memory playback, serial command control, and CW receive decoding.
Main Features
- CW speed adjustable from 1 to 999 WPM.
- Winkey 1.0 and 2.0 protocol emulation for logging and contest software.
- USB keyboard support for sending CW without a computer keyboard interface setup.
- Rotary encoder for speed control and command-mode entry.
- PTT output with configurable lead, tail, and hang timing.
- Three onboard memory buttons, with extended memory control through CLI and keyboard commands.
- Iambic A, Iambic B, bug, straight key, and Ultimatic modes.
- Adjustable sidetone, weighting, dah-to-dit ratio, autospace, Farnsworth timing, and prosigns.
Power And Ports
The keyer is powered from USB. Either USB port can power the unit, but the rear USB port is normally used for Winkey emulation and the front USB port is recommended for serial command-line control.
- TX: connect to the transceiver key input with a 3.5 mm stereo cable.
- RTS: can be used when software controls CW through the USB-TTL RTS line.
- PTT: connect to an amplifier PTT input with an RCA cable.
- PADDLE: connect an iambic paddle with a 3.5 mm stereo cable.
- USB HOST: connect a standard USB keyboard for keyboard CW operation.
- TONE IN: audio input for the experimental CW decoder.
Winkey Setup Notes
For Winkey use, connect the rear USB port to the computer and install the CH340 USB driver if needed. In N1MM or similar logging software, choose the detected serial port, set the radio column to none when the port is used only for keying, enable CW/Other, and select Winkey in the port details.
Recommended Winkey settings from the original manual include matching the keying mode to your keyer, enabling autospace when useful, leaving second output disabled, and choosing a comfortable sidetone frequency for long operating sessions.
Command Mode
Press the CMD rotary switch to enter command mode. The keyer confirms command mode with an audio prompt. Send commands with the paddle, then exit by sending X or pressing CMD again.
If a command is not recognized, the keyer sends a question mark so you can retry the command.
Serial CLI Commands
The serial command-line interface uses commands preceded by a backslash. A few useful commands are:
\?– show help.\s– show keyer status and memory contents.\w###– set speed in WPM.\a– switch to Iambic A mode.\b– switch to Iambic B mode.\g– switch to bug mode.\o– toggle sidetone on or off.\t– tune mode.\u– manual PTT toggle.\z– toggle autospace.\\– clear sending buffers and stop memory sending.
USB Keyboard Shortcuts
A standard USB keyboard can be connected to the USB HOST port. Useful keyboard actions include:
- F1 through F12 – play memories.
- Shift + F1/F2/F3 – program memory slots.
- Up and Down arrows – adjust CW speed by 1 WPM.
- Esc – stop sending and clear the buffer.
- Tab – pause sending.
- Ctrl+A / Ctrl+B – select Iambic A or Iambic B.
- Ctrl+O – toggle sidetone.
- Ctrl+T – tune.
- Ctrl+W – set WPM.
Memory Operation
Memories can be played using the physical memory buttons or through CLI commands. To program memory 1 from the CLI, use a command like \p1CQ CQ CQ DE K3NG. Memory macros can change speed, send serial numbers, insert spaces, activate PTT, repeat a memory, or jump between memories.
Firmware Notes
The Funtronics K3NG Keyer supports Arduino firmware updates. Use the Arduino IDE and the ELEKITSORPARTS version of the sketch and libraries when possible, because the pin definitions differ from the original K3NG project.
Support
For product support, use the contact page and include your product name, order details if relevant, and a short description of the issue.