Description
Notice:
- The $100 shipping cost is not correct, the final postage will be calculated on a correctly entered Postal Code when checking out.
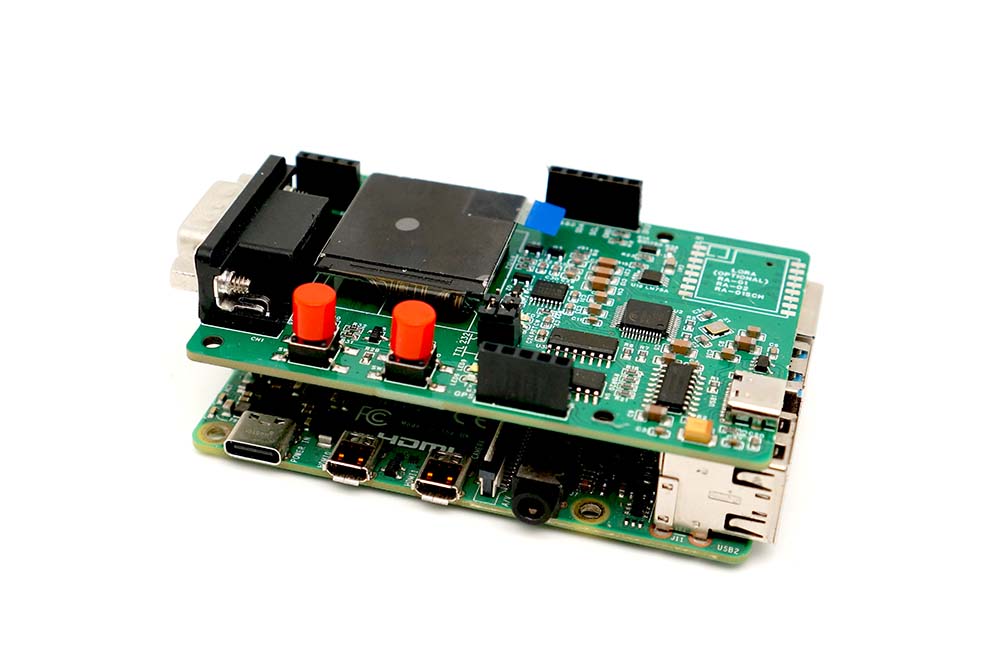
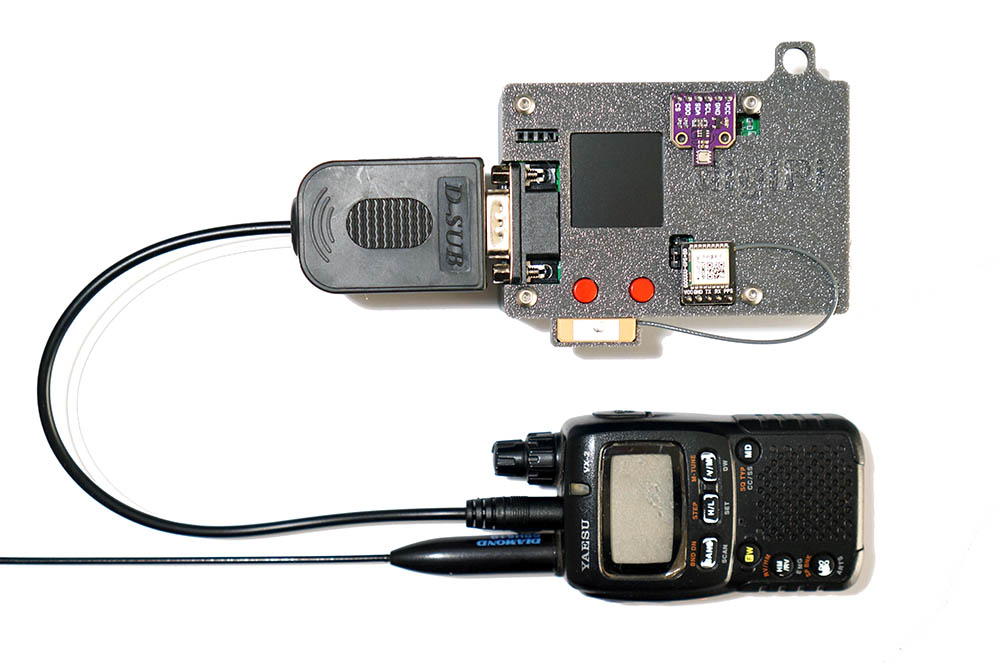
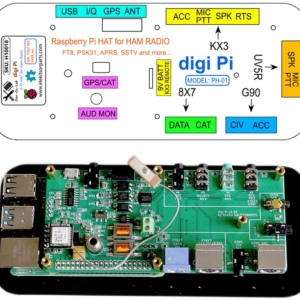
This is the new digiPi HAT for ham radio digi modes from a raspberry Pi. The board is desgned to be topped on a Raspberry Pi 4 or 5, on which you could work ham radio digital modes remotely. The new digiPi HAT is compatible with KM6LYW’s digiPi image. With KM6LYW’s image, you could work digi modes from a tablet or a smart phone through an internet browser. If you don’t use the KM6LYW’s image, you could still use the new digiPi HAT on a regular rasbian or debian OS by installing the softwares like wsjtx or direwolf, which enable you to work FT8/FT4 or APRS on your Pi SBC. In this case, the TFT LCD will not work, unless you could write your own C++ or Python code to make it display somethings, callsign, the decoded info from direwolf or wsjtx.
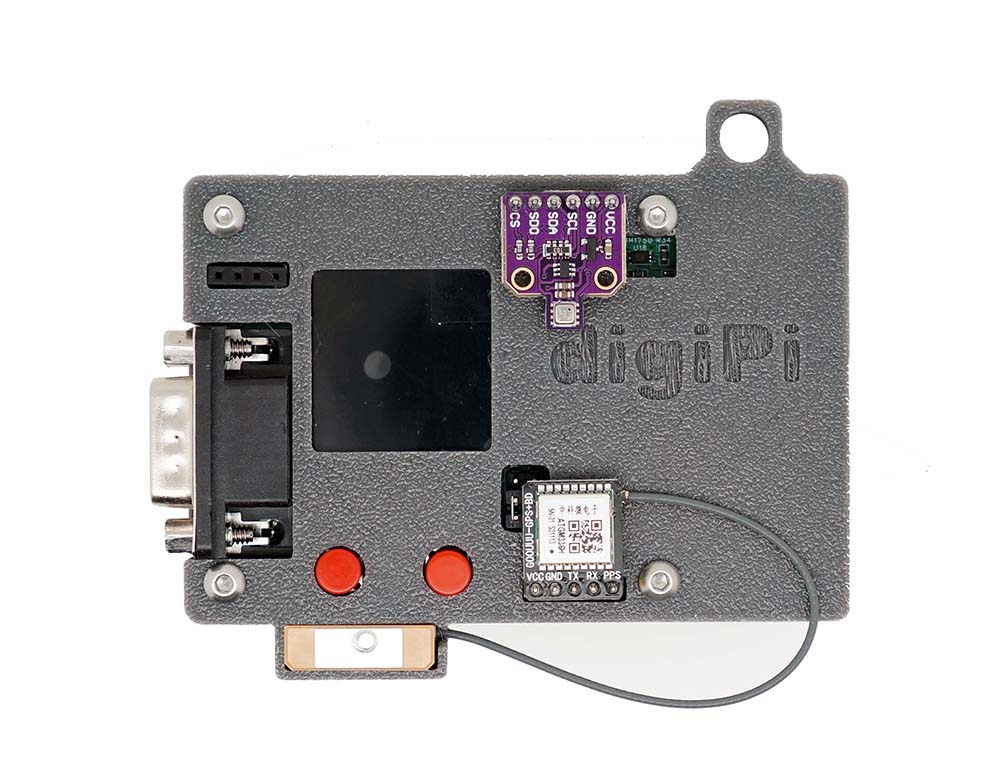
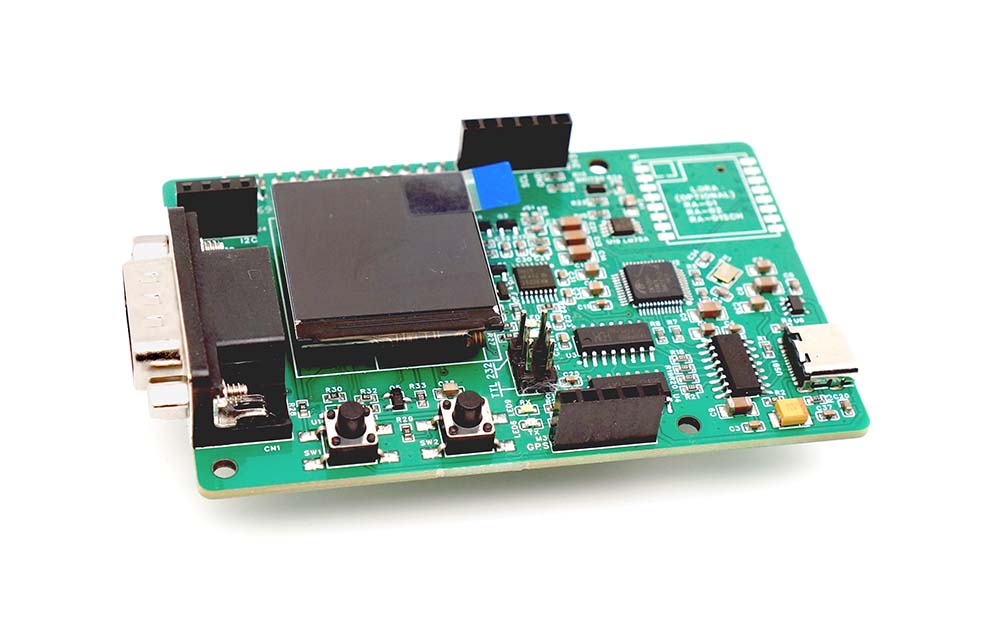
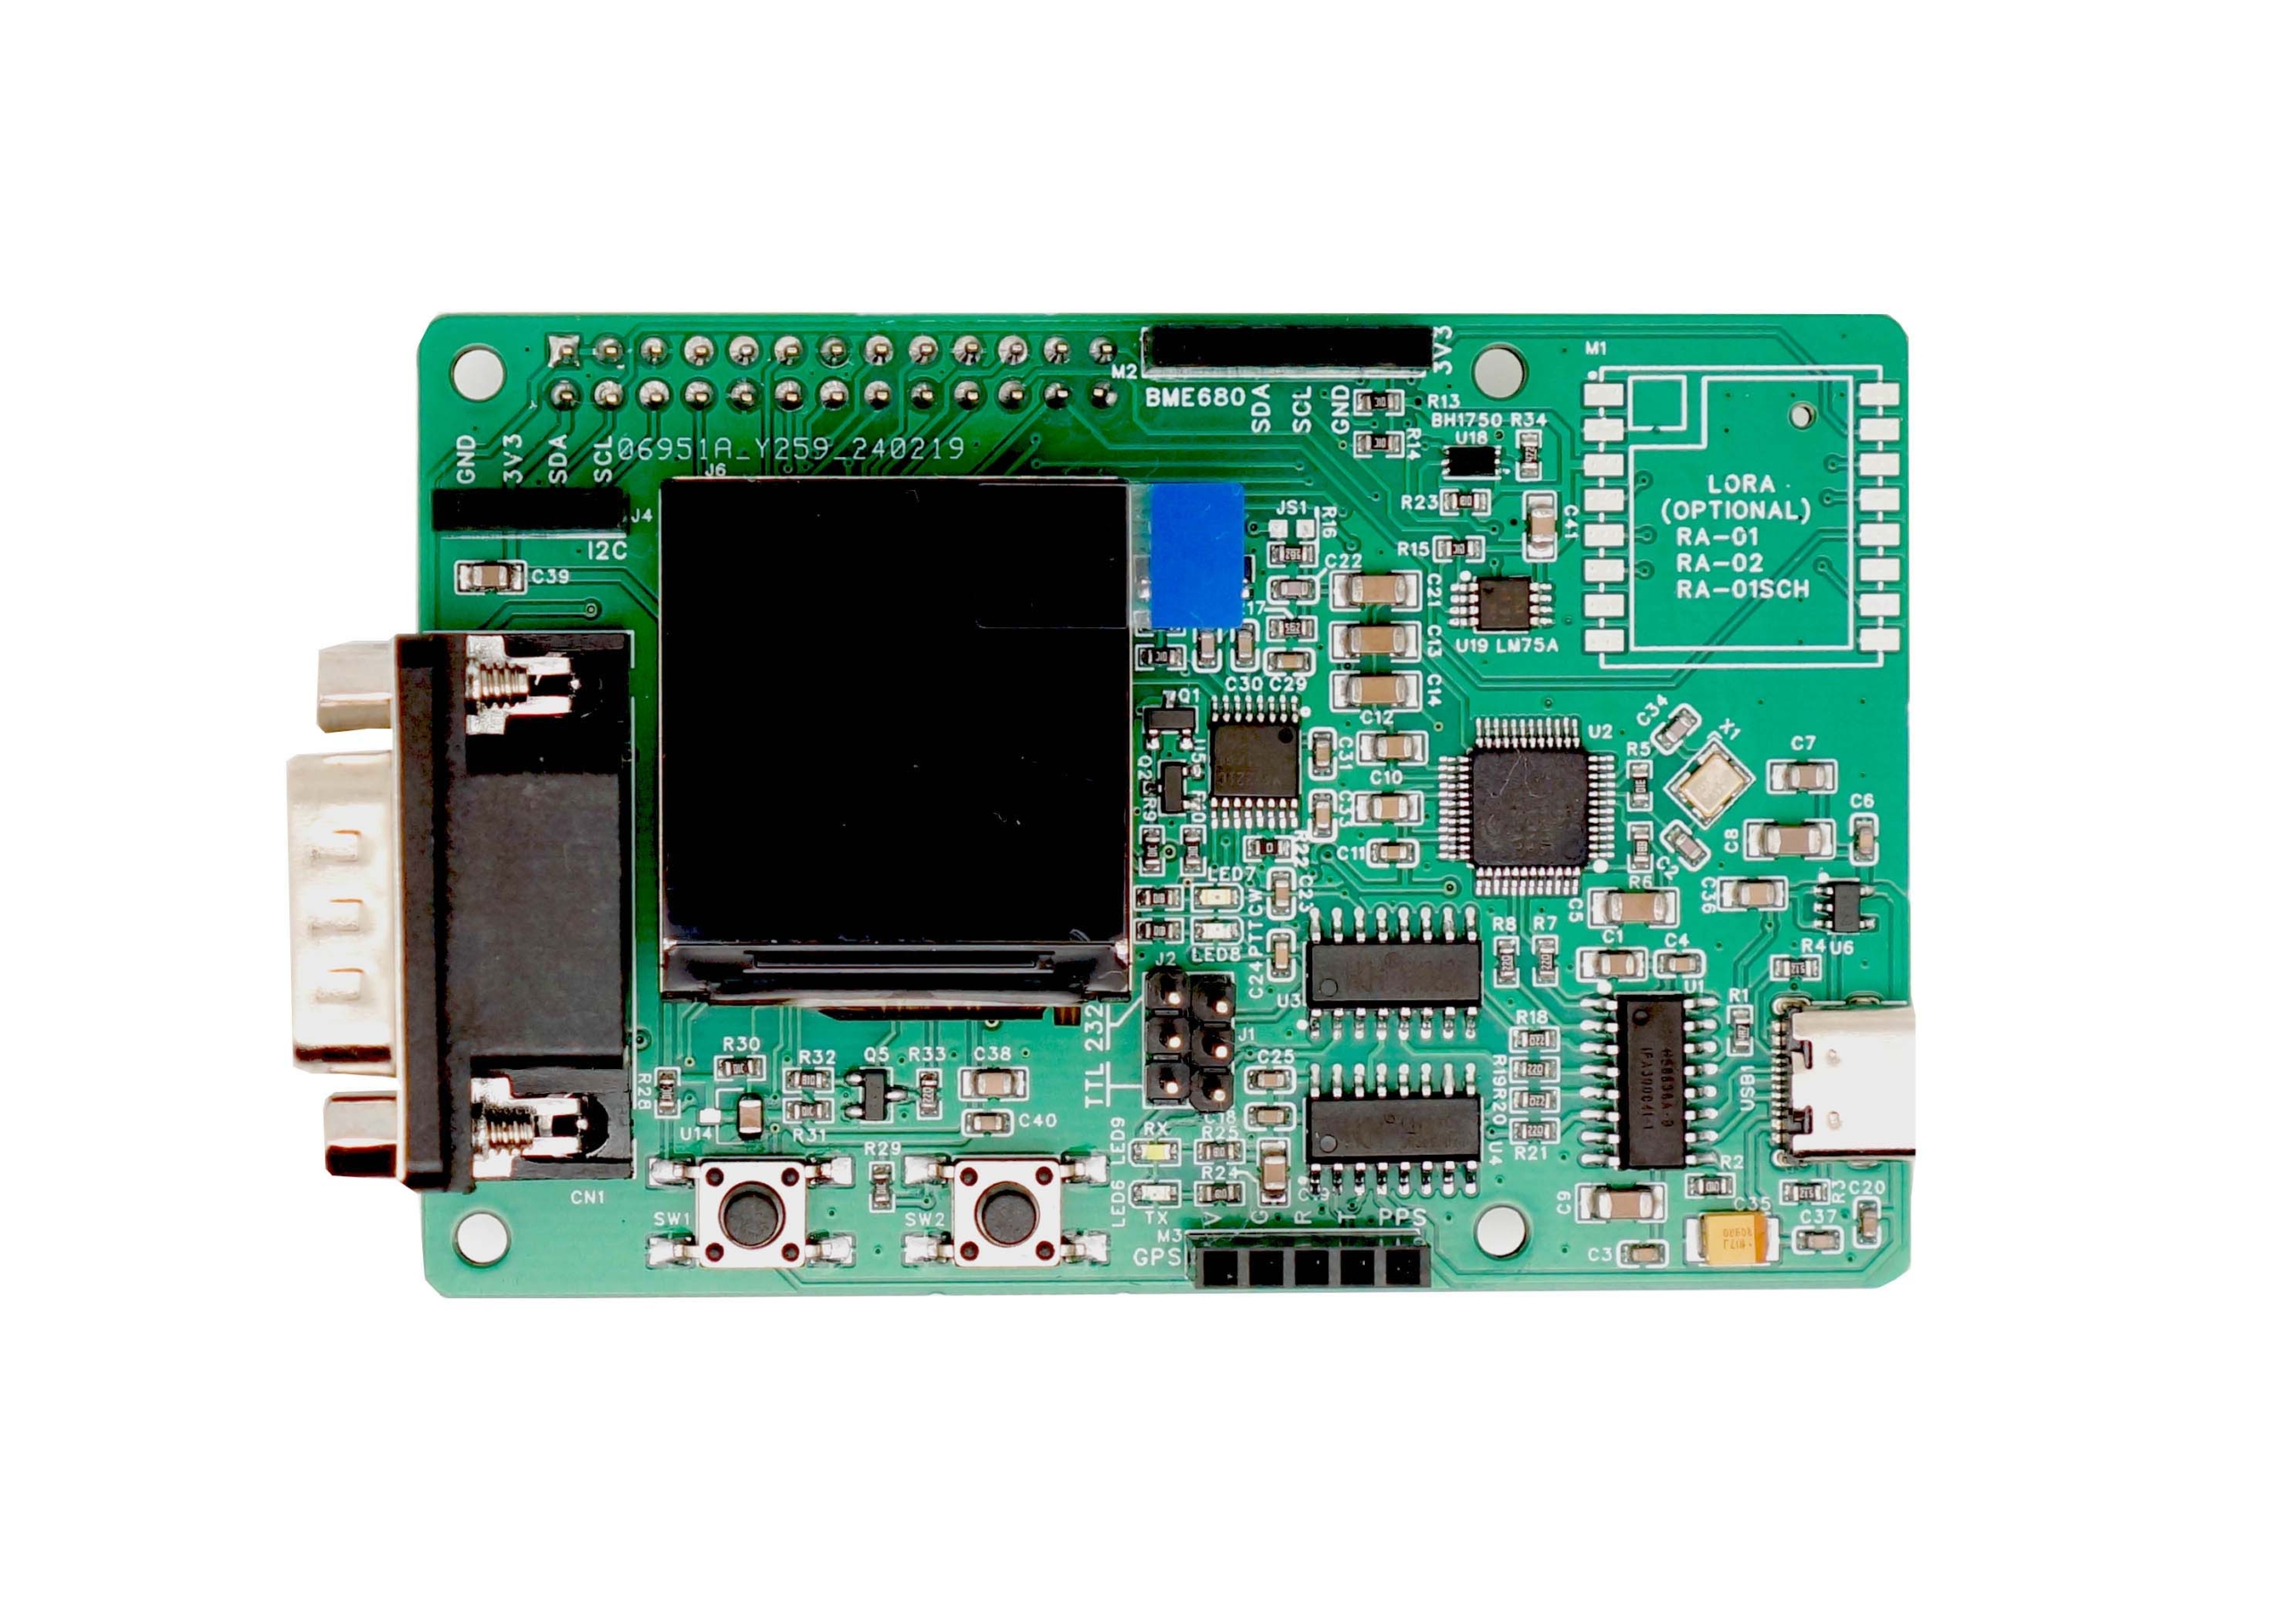
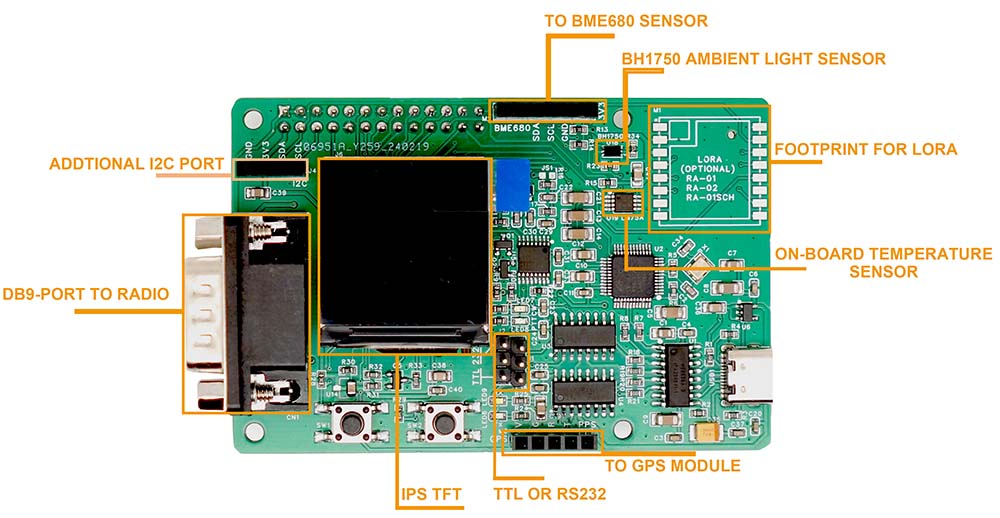
Our new digiPi HAT integrates a TFT LCD, two buttons, an on-board temperature sensor(LM75A), an ambient light sensor(BH1750), three 2.54 pin-headers for connecting it to a bme680 enviromental sensor, an external GPS module or some other sensors with I2C interface. These sensors could be used for experimental purpose, that says, with these sensors, you are able to make more funs on APRS by sending beacon packets containing the info measured by the installed sensors or a positional info from a GPS. We also preserve a PCB footprint for lora modules. You could install a SX1278, SX1276 or a LLCC68 lora module on your own. With a lora module, you could receive some lora packets and have it sent again by APRS, but you need C++ or Python skills to do this. YOU DON’T HAVE TO BUY A BME680 and A GPS MODULE if you just use the digiPi HAT for the normal ham radio digi modes operation.
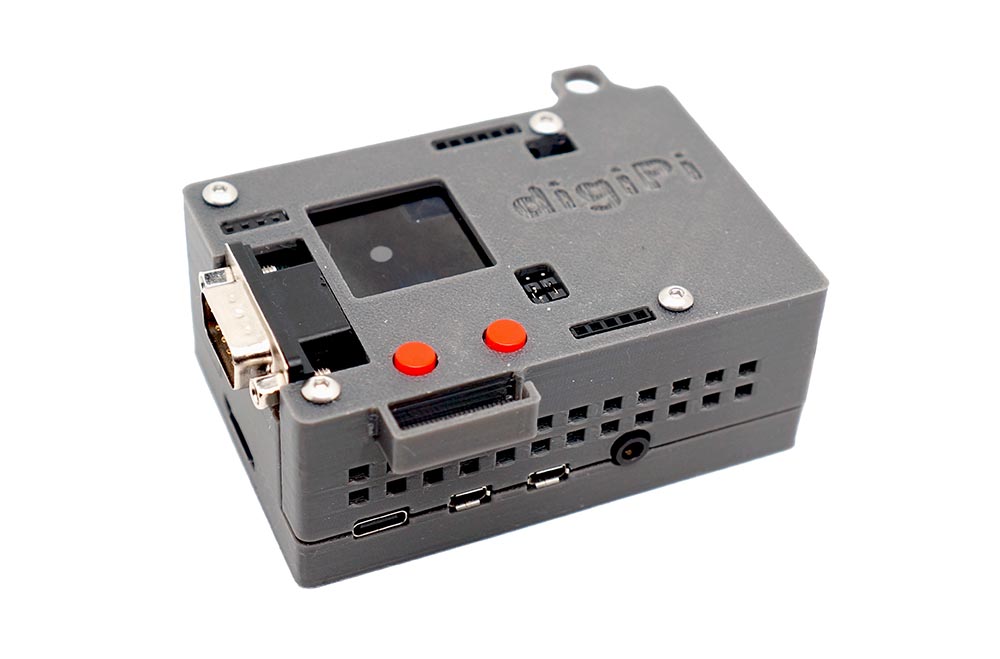
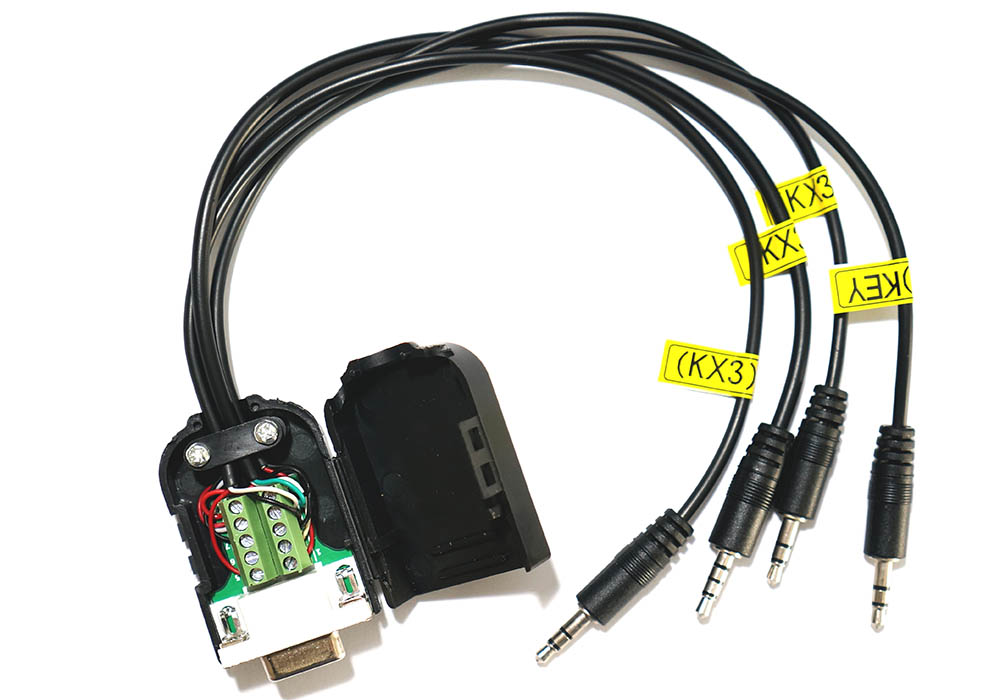
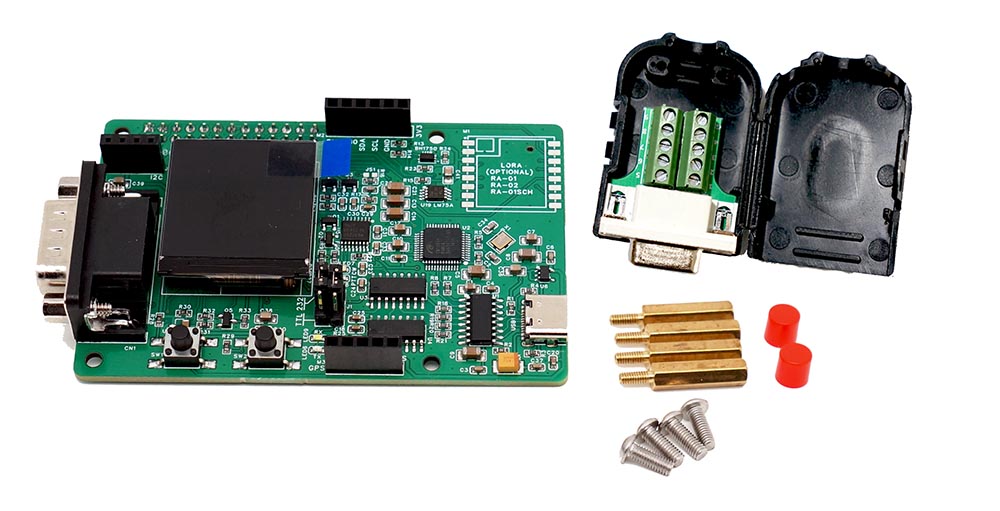
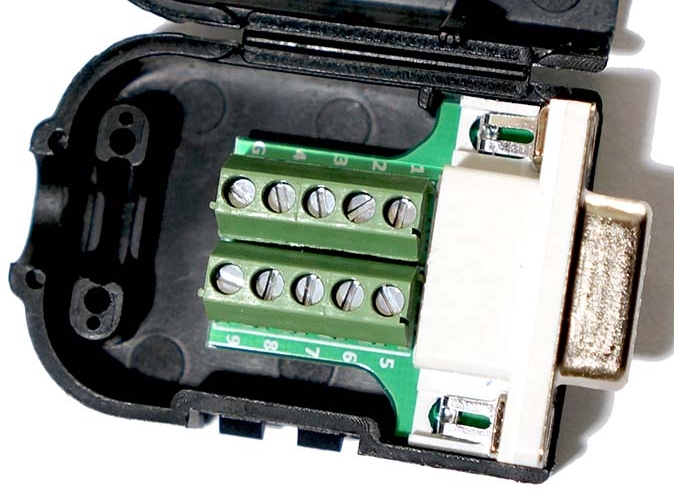
By the way, a short USB-C cable is supplied in the package for connecting the board to your Pi or your PC. If you connect it to your PC, the sensors, LCD and the buttons will not work, but the you could still work digi modes from your PC. No rig cables are supplied in the package, you have to make your own. A db-9 female connector comes with the board, and you don’t need to do any solderings for make your own rig cables, just screwing on the db-9 female connector. We also designed a 3d printed case for it, you can download the file and have it printed or buy the options with a 3d printed case.
 FEATURES:
- One Type-C cable for Soundcard and Serial Control, capable to work with your Pi or PC
- IPS TFT and Two Buttons, Compatible with KM6LYW’s digiPi Image
- Easy to Make Your Own Cables by DB9 Connector, with NO Soldering Needed
- Optional GPS, BME680 module for APRS or GPSd applications
- An additional I2C Header for other I2C Sensors
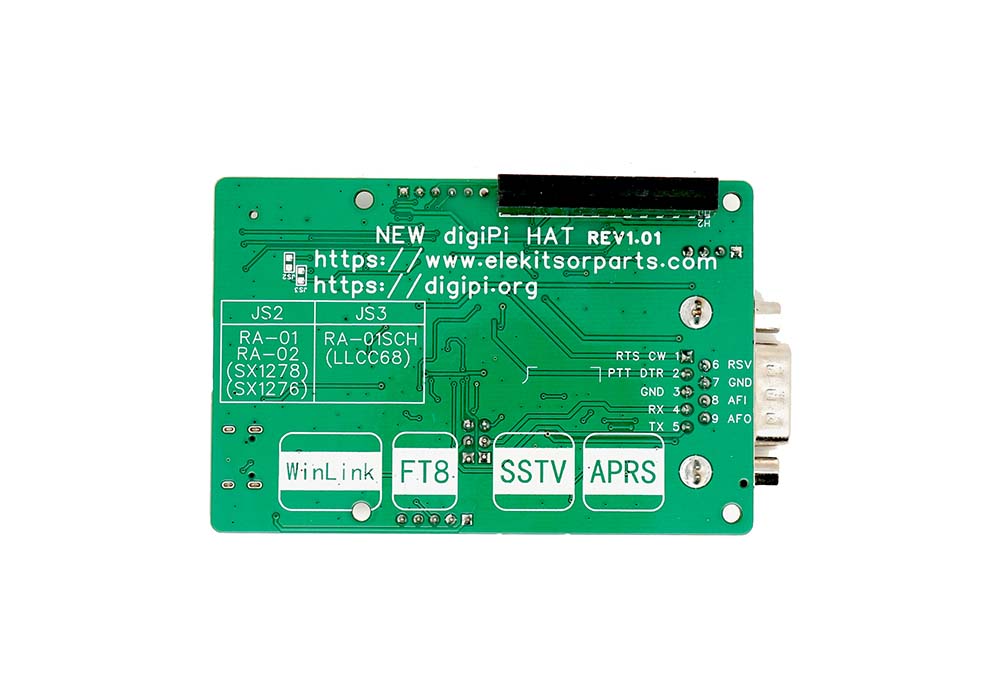
- PCB Footprint Reserved for Lora Module for Experimenting Lora to APRS Applications
NOTE:
- A Raspberry Pi is not included in the kit, and we recommend to use a raspberry Pi 4 or Pi 5 to work with your digi Pi.
- If your radio has a built-in USB port, you don’t need to buy a digiPi HAT for digi modes, just download an appropriate image and connect it to your Pi.
- The KM6LYW’s “digiPi” image is the best companion for working with ‘digiPi’ HAT.
- You can also use the the “Ham Pi” image, see https://github.com/dslotter/HamPi/, but you have to know more for configuring some of the softwares.
- If you do not want to use those images, you could still to install softwares by yourself, here is a link as a reference, click to see, thanks to DL1GKK.
- A Jumper on the board(J2 and J1) is used to set the TTL or RS232 Output, before making the cables, you have to know your radio’s Serial Input Level: TTL or RS232, for example, FT8x7 is TTL level, you have to set J1 and J2 on “2-3” position, Elecraft KX3 is RS232 Level, so you have to set J1 and J2 on “1-2” position.
- The 3d printed case currently supports Raspberry Pi4, and Pi5. The STL files for both Pi4 and Pi5 are now available, you could download the files from the Resource List section.
DB9 Pin Definitions:
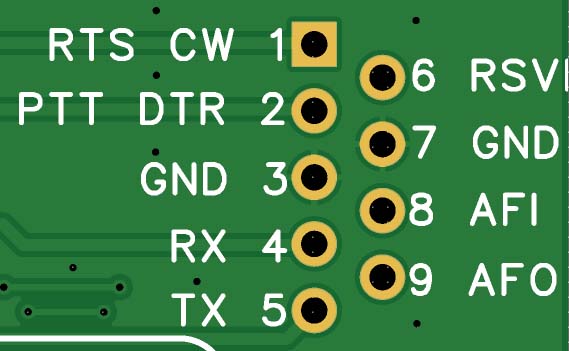
- RTS >>>>>>> for connecting to your radio’s KEY IN or CW port
- DTR >>>>>>> for connecting to your radio’s PTT IN port
- GND >>>>>>> ground pin
- RX >>>>>>>> serial RX (TTL or 232 Level) in for connecting to your radio’s TX out pin for CAT control
- TX >>>>>>>> serial TX (TTL or 232 Level) out for connecting to your radio’s RX in pin for CAT control
- RSVD >>>>>> reserved, not used
- GND >>>>>> ground pin
- AFI >>>>>>> audio in for connecting to your radio’s AUDIO OUT, SPEAKER, or PHONE port
- AFO >>>>>> audio out for connecting to your radio’s MIC IN port
An example wiring digram to the Baofeng UV5R handheld radio: 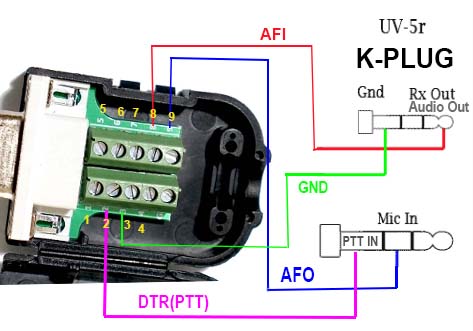 For Yaesu CT-167, please try the following wiring scheme:
——————————————————————–
CT-167 >>>>>>>>>>>>DB9 on New digiPi HAT
1.PKD(packet data input) >>>>>> 9.AFO
2.GND >>>>>> 3.GND
3.PSK(PTT)>>>>>> 2.DTR
4.RX9600 >>>>>> 8.AFI(if 9600 bps, not tested)
5.RX1200 >>>>>> 8.AFI(if 1200 bps)
6.PK SQL >>>>>> None
7.TXD >>>>>> 4.RX
8.RXD >>>>>> 5.TX
9.CTS >>>>>> None
10.RTS >>>>>> None
For Yaesu CT-39A, please try the following wiring scheme:
Resource List:
- Case Model for 3D Print
- digiPi Image
- New digiPi HAT Schematic
- New digiPi HAT Initial Assembly
- Software Initialization (KM6LYW’s digiPi Image)
Shipping List:
- New digiPi HAT Board x 1
- Screws, Copper Standoffs (M2.5 x 17) x 4
- USB Type-C Cable (10cm) x 1
- Optional 3d printed case (top and bottom) x 1
- Optional BME680 Sensor x 1
- Optional GPS Module x 1
Questions and Answers:
Question 1: Q: What is the new digiPi HAT designed for?
A: The digiPi HAT is designed to enhance amateur radio operations by allowing users to work digital modes remotely using a Raspberry Pi 4 or 5.
Question 2: Q: How is the new digiPi HAT compatible with KM6LYW’s image?
A: The digiPi HAT is compatible with KM6LYW’s image, enabling users to operate digital modes through an internet browser on a tablet or smartphone, providing a convenient remote operation capability.
Question 3: Q: Can the new digiPi HAT be used without KM6LYW’s image?
A: Yes, the digiPi HAT can also function on a regular Raspbian or Debian OS by installing software like wsjtx or direwolf, which enables operation of modes such as FT8/FT4 or APRS.
Question 4: Q: What features does the new digiPi HAT integrate for enhanced functionality?
A: The digiPi HAT integrates a TFT LCD, temperature sensor (LM75A), ambient light sensor (BH1750), and I2C interface for connecting environmental sensors or GPS modules, enhancing the capabilities for APRS and experimental purposes.
Question 5: Q: What is the purpose of the PCB footprint for lora modules on the new digiPi HAT?
A: The PCB footprint for lora modules allows users to install a compatible lora module, enabling the reception and transmission of lora packets via APRS, although this requires C++ or Python programming skills.
Question 6: Q: What is included in the new digiPi HAT package for connectivity?
A: The digiPi HAT package includes a short USB-C cable for connecting to a Raspberry Pi or PC, and a DB-9 female connector for making rig cables without soldering. 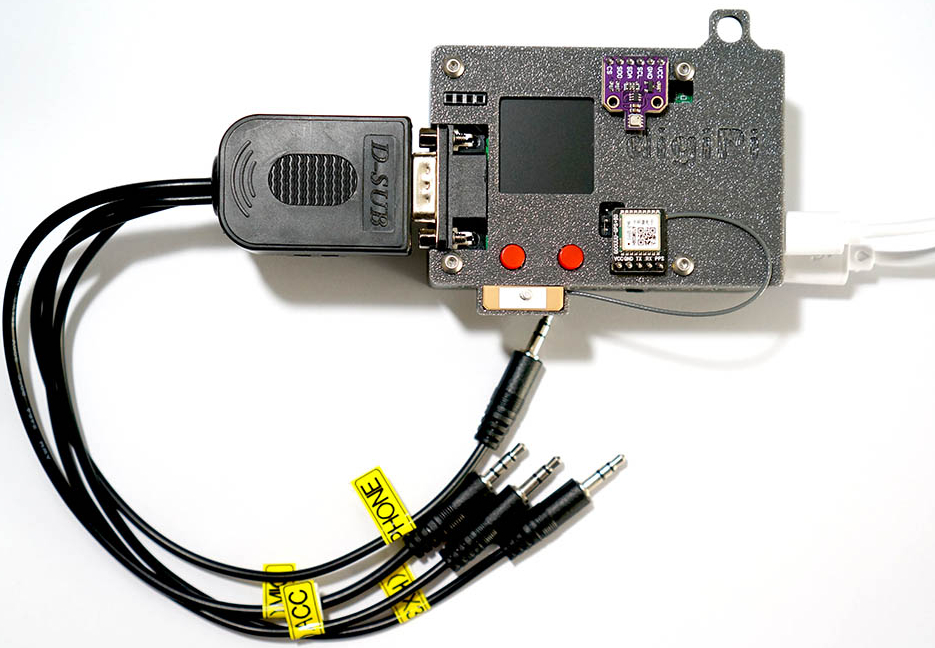 Question 7: Q: Can the TFT LCD work with non-KM6LYW images?
A: The TFT LCD will not work out of the box with non-KM6LYW images; however, users with programming skills can write their own C++ or Python code to make it display information.
Question 8: Q: How can I get a 3D printed case for the digiPi HAT?
A: Users can download the 3D printed case file and print it themselves or purchase the digiPi HAT with an optional 3D printed case. 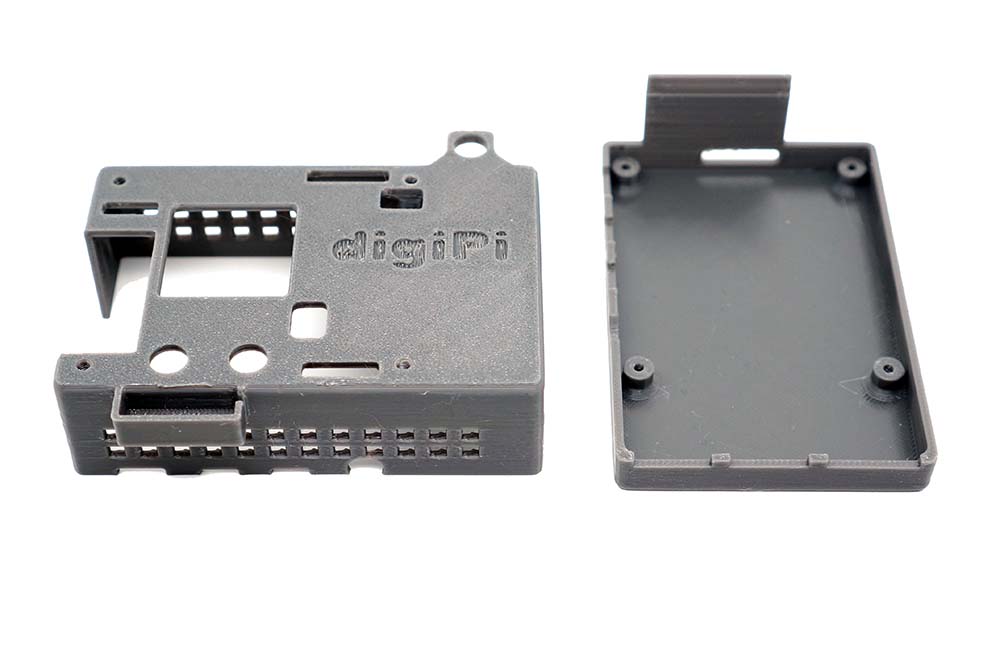
Leave a Reply